We take on the expansion storage crisis of modern games and Hogwarts Battle with a Laserox Organizer
- Sam-Wise

- Jan 13, 2023
- 11 min read
Updated: Dec 13, 2023
The in box storage crisis:
Gamers everywhere know the all too common struggles associated with poorly designed in box game storage solutions. It is not a problem that is associated with any particular format either. Whether the packaging designer has implemented vacuum formed plastic trays, cardboard dividers, inner boxes or often worst of all – nothing. These storage solutions can be rife with minor or major faults that can mean games don’t remain sorted in storage, don’t fit back in the box or end up getting damaged. One very common complaint, especially for popular games that see lots of play, is that if you sleeve your cards to protect them they no longer fit in the box – either because the thickness is increased or because of the extra 1-2mm in height and width. What is particularly incredible is that some game companies even sell their own branded sleeves and yet still do not allow for their use when designing packaging.
Another common phenomenon that compounds these storage situations are game expansions. Many game companies now introduce expansions to increase the replayability of their games. Sometimes this is to breathe new life into an old game, provide additional content that would if included in the base game make it undesirably expensive, to introduce new game mechanics to ‘fix’ and/or ‘enhance’ the base game, or they can be a shameless cash grab. Indeed, many games now launch with expansions already available (this is now especially common for Kickstarters). But regardless of the merits of these expansions, they bring new components to the games and just like the base game the quality of the packaging varies immensely. However, many gamers like to keep a base game and expansions together and generally speaking compiling all content into one vessel is the most desirable, rather than having to store and set up games using any number of boxes. The problem is that base game boxes are rarely designed to accommodate this. But there are many work arounds (for both base game and expansion storage issues) that vary in suitability as much as the mass manufactured versions. Some buy new bigger boxes, make their own trays/dividers using a range of materials or simply scrap the original trays and stuff everything in the original box.
However, there is another option. Buying a new storage solution that is designed specifically to address the storage crisis. Now these still vary in price, quality and materials. I know the idea of paying to fix a problem that many people will consider a manufacturing issue wont suit everyone. However, to address one such storage crisis of mine (and to provide our Diary of a Lincoln Geek followers with some valuable insight) I have recently purchased and tested one of these unofficial after market storage solutions.
Being an avid tabletop gamer and content completionist (meaning I like to have all the add-ons), it probably comes as no surprise that my game collection has several games crying out to be properly housed. One of the games that has been waiting the longest for this is one of my favourites – Harry Potter: Hogwarts Battle. The base game tray was fairly well designed, if perhaps a little flimsy. However, it was never intended to store the two expansions that followed it. With some creativity, however, it is just possible to fit everything in if you don’t mind a little rise in where the box lid sits and storing components under the vacuum formed tray. For me this has been very much a make-do solution and has actually reduced how often the game is played due to the hassle of set up and pack away. I therefore decided to see how well a ‘custom’ designed solution performs.


The next section goes into a full break down of the product and my experience completing it. For a concise review, skip to the final section. But for those interested in all the little details read on, as I solemnly swear that I am up to no good.
The Buying Experience
When I went looking for a storage solution for my game I found several different places that provide this type of product and the games they have chosen to create for don’t overlap much. So much so in fact it seems that they may deliberately avoid this due to the niche nature of their products.
Therefore, to say I chose one design out of several would be inaccurate. Instead I did a little research, and decided to go for it. The product I have purchased as a first step into aftermarket game storage is the Hogwarts Battle Organiser from Laserox (www.laserox.net), a company based in Hungary.


Purchasing the organiser was very straight forward. The Laserox website was easy to navigate and had an effective search bar. I was able to quickly find the item I wanted and the other compatible items Laserox supply. Based on the recommendations of some previous purchasers, I decided to add a set of extra wooden dividers for the organiser to my order. The total of my ‘cart’ came to 26.50 Euros which was approx £23 at the time of ordering (September 2022). This was not in my opinion a bad price. However, I was a bit surprised to find only one rather expensive shipping option. To FedEx my purchase from Hungary to UK cost about the same as the organiser itself. While I know that shipping everywhere has increased exponentially, this was a little hard to believe. However, I knew I wanted this product for my game, as a test run for other games and to share with you. So, I went ahead with the order. After a couple of days to process and dispatch then a few more to ship, it arrived.
Unboxing:
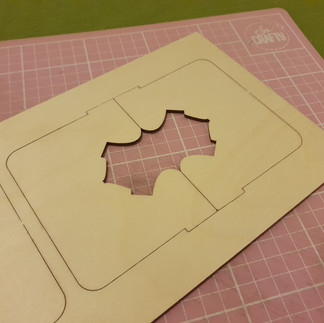
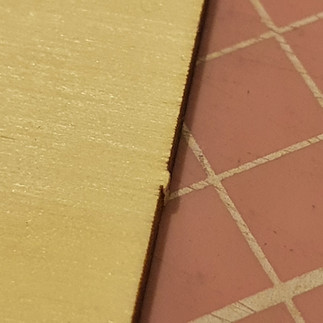
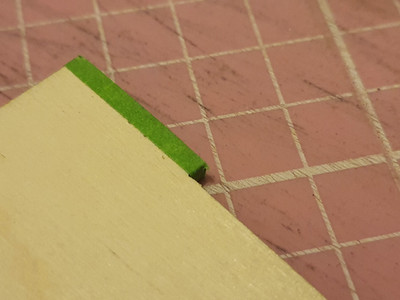
The parcel was a little squashed in transit, however the goods inside were unharmed. Personally, I think that the packaging could be adapted slightly to both reduce its size and increase its integrity. However, upon opening the parcel I found both of my ordered items and just had to go through them straight away. The main organiser came supplied as three 24x37cm sheets of 3mm plywood and the extra dividers as two 16x37cm sheets. On these sheets were all the components needed to build the organiser that had been almost fully cut out by laser. The various pieces were still attached to the sheet by small tags. Following the instructions, I carefully removed each piece with a fine blade. I personally used a disposable scalpel but an X-Acto knife or Stanley blade would also work. I examined all the components once freed from their sheets and noticed a few things. Firstly, that no matter how carefully cut out some small traces of the tags remained leaving either a small bump or a course edge. Second, where tags occurred in conjunction with certain grain directions that these could start splits and splinters. Third, that some components displayed minor levels of warping (always a potential issue with wooden components although usually minimal with ply/MDF due to their construction). And lastly, the finish of the plywood was nice and smooth but also very pale. Now this is not necessarily a bad thing but for a game like Hogwarts Battle it’s not really in keeping with the aesthetic of the wizarding world. But these are all easily overcome if you are happy to put in a little extra time and effort.


How to get the best results:
To tackle the tag remnants and potential splits and splinters they could bring, use fine grade sandpaper or an emery board. However, do be gentle as many of these tags occur on connecting and gluing tabs which are themselves quite fine and an overly heavy hand could take away or break necessary material and reduce their effectiveness. If you have a steady hand, however, you should be able to do this free-hand. If not, I recommend using either a flat surface to place the sandpaper on, making it easier to keep steady and square, or attach the sandpaper to a surface that will hold it at 90 degrees when sat on a table and then rest components on the table when sanding against this surface.
The minor warping I encountered was easily solved by being strategic when gluing up. By having the warped sections bow inward the other sections once glued corrected the shape. If anybody encounters more extreme warping getting replacement sections would be the best solution. But if this is not possible, or if you want to attempt fixing this issue yourself, then I would recommend lightly dampening the warped component with clean water, weighing it down to a flat surface and placing it in a warm environment such as an airing cupboard until fully dried.
The next item is a matter of personal preference - the light (and bare) plywood finish. Whilst lovely and clean looking being unsealed means it will discolour and splinter more easily. Also for a game based on a rustic old-timey world, this is not in keeping.
I decided to go all the way with my organiser, as I felt that as this was for one of my favourite games it would be worth it. I chose to use one of my favourite wood finish products the Osmo Wood Wax Finish. Of all the various wood stains and finishes I have used over the years this raises the grain the least and is easily applied. However I couldn’t simply dive straight in, first I needed to very lightly sand the surfaces to be stained with very fine sandpaper. I then masked off all the joints that would be glued to keep them bare of finish and ensure the strongest possible bond.


Once this preparation was complete, I lightly applied three coats of Osmo Wood Wax Finish (Light Oak) to each side. This achieved the colour that I desired, and I was ready to glue up. This was for the most part a straightforward process, as the instructional diagram was quite clear. I applied a good amount of Gorilla wood glue using a matchstick, ensuring to get full coverage but not be excessive. I did find that several joints were quite a snug fit and advise against trying a dry run assembly as some tabs would be likely to break when taking apart. Therefore, I recommend laying out all components beforehand. As the organiser is too lightweight to be clamped together whilst the glue dries I found that tightly binding the corners with masking tape was the best way to hold everything in place. Once assembly was complete, I used a fine blade and a damp cloth to clear up any excess glue.


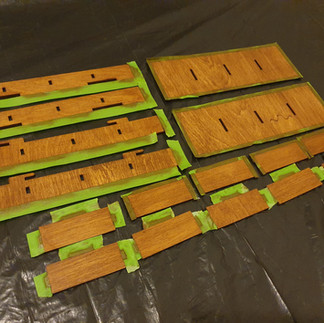


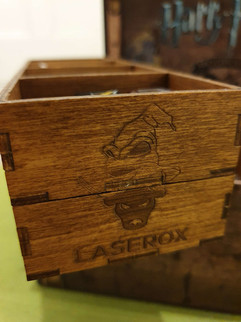
When the organiser was fully dry, I was pleased with the form and colour but decided that I wanted to get a silky smooth finish to the wood. First, I touched up any small imperfections in the wood stain. Then, I applied two coats of Osmo Wood Wax (clear) as a top coat and sealant. Due to the thin material, I decided that light sanding between coats was inadvisable. This however meant that to get the finish I desired, I then needed to apply 2 coats of clear natural bees wax. Now I know that many readers will be thinking that this is an awful lot of work just to change the colour and seal the wood. And you would be correct. However, the results really are good.


I never expected to go to these lengths to just get the organiser assembled, but I am so glad that I did. However, for those who would like to change the colour of their organisers but not go to the extremes I have I would recommend using fine coats of spray finish or a tinted wax, but do take the time to mask off gluing surfaces as it is critical to get a strong join.
While I hope that our readers have found the breakdown of my assembly process interesting. I know what you REALLY want to know – does it work and is it worth it?....
Does it work?
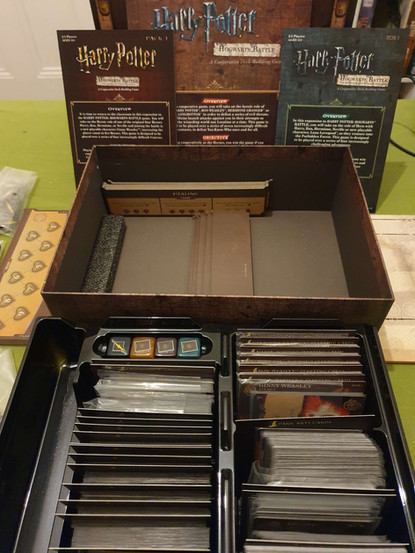
The short answer here is: yes. The organiser itself is pretty simple, it consists of two channels with dividers that are large enough to house all the cards from the main game and its three (current) expansions even when the standard size cards are sleeved. Also, while I have been unable to test this I believe there is space enough to accommodate sleeves on the square and oversized cards as well. My favourite feature of the organiser are the token trays, these are two four compartment removable storage trays that slot together and sit in the middle section of the organiser when packed away. One small bit of advice though is to use the bottom tray for the smallest components, as the top tray does not have a lid and its contents are only held in place by the charm boards from the Charms and Potions expansion. For those who have only the first expansion I would suggest using small zip lock bags to keep top tray items tidy in storage. I also agree with the recommendations that I found online regarding the additional dividers. Whilst these are definitely not essential, they are very useful for ensuring everything stays perfectly organised. A few details that I particularly enjoy are the Hogwarts crest shape cut out on the dividers to make it easier to withdraw components, the merged Laserox logo, and the sorting hat detail on the ends of the token trays.


Was it worth it?
This is a harder question to answer. I’m not trying to get out of giving a firm recommendation. However, this will come down to a matter of personal taste. My personal feeling is yes this is worth it. The convenience of easy set up and pack away means that the game will get far more use. Safe storage of game components means that they will last much longer. And it just looks and feels so much better. The organiser looks great regardless of if you put in the extra time and energy or not. For me the only significant downer is the shipping cost. I definitely recommend trying to buy these organisers at trade shows and expos, as I can pretty much guarantee that ticket prices for these events will be cheaper than FedEx!
Summary:
Buying Experience: Very easy and straight forward. 6/6
Value for Money (not including delivery): Whilst it is an annoyance to have to shell out to fix this issue, I can't complain at the price of the unit. 5/6
Packing/Shipping: This was the only real letdown. The flat packed organiser was shipped in a box big enough for a decent sized game with no real protection. The product could have fit in to a large jiffy bag or similar and be just as well packed. The box then arrived flattened and slightly ripped. Add in the extortionate FedEx shipping charge and this is a big turn off (this is of course more of a FedEx problem than the fault of Laserox). 2/6
Components: The components are all well-produced for the price-point, although if I were to have any complaint here it would be the locations of some of the tags and grain direction of some components. Some tags are located on gluing tabs/joints which are comparatively delicate and over sanding or bending could damage these areas. While Laserox have kept waste to a minimum in arranging the cut outs the grain direction isn’t always consistent this is not a huge issue, however. 5/6
Assembly: With the diagram for guidance and the rather simple design, this is straightforward. The tight fitting components serve you well to ensure alignment, but some can be a bit tight to drive all the way home. Given the delicate scale of the joints this can be a little awkward, and this does not allow for a dry run at assembly without risk of damage. 5/6
Finished Item: The organiser looks smart regardless of how you choose to finish it. There are some really nice details such as the locking token trays and the design of the dividers. But most importantly, it works. The Laserox Hogwarts Battle Organiser really does hold all the games cards (over 550 of them) game boards, player boards, charms boards, rules, and tokens neatly and safely in one box resulting in less than 1 cm box lid rise. The only possible criticism here is that for buyers with only the first expansion the contents of the top token tray has very little to hold them in. My suggested fix for this would be to find something to place under the token trays to raise their level so that when the boards are in place they act as a lid. 5/6

Overall: Not much more to say other than to say that I am very pleased with my first Laserox purchase and that I will definitely keep checking back with them for organisers to my favourite games. Though I will be avoiding the shipping charge as much as possible. 5/6
Mischief Managed!
Sam-wise


Comments